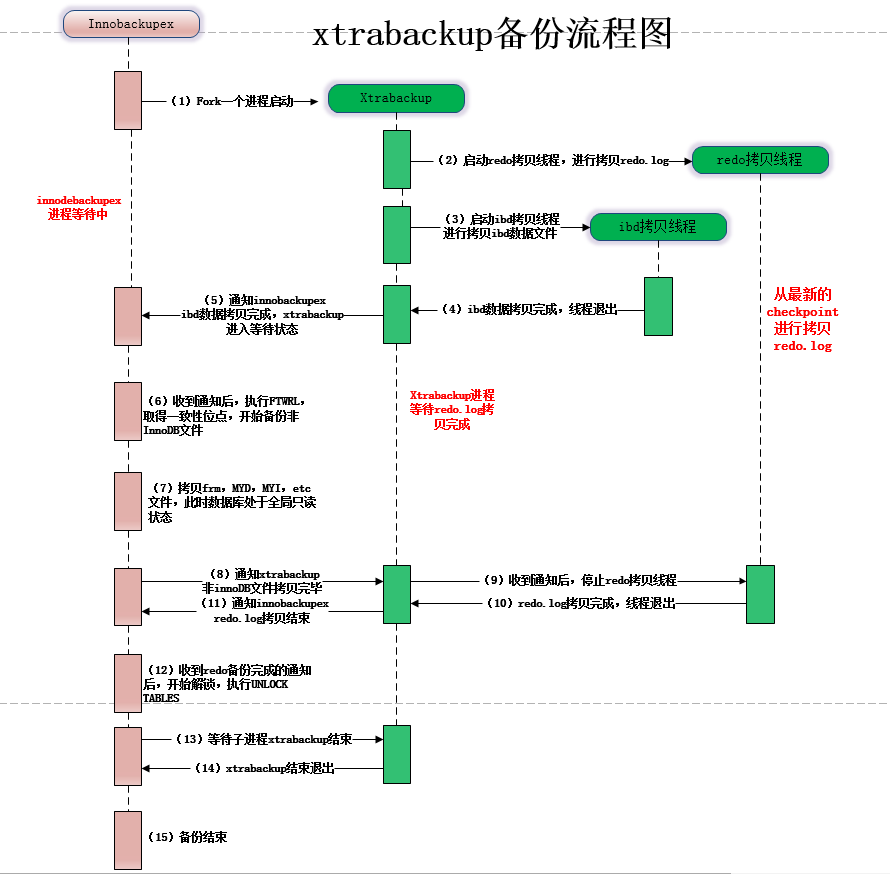
说明
版本2.4 支持Mysql8.0以下的mysql版本
版本8.0以上支持mysql8的innodb 的版本
xtra_backup仅支持innodb引擎。
安装xtra_backup
进入官方网站 ![https://docs.percona.com/percona-xtrabackup/2.4/installation/binary-tarball.html]
采用tarball的安装方法
wget https://downloads.percona.com/downloads/Percona-XtraBackup-2.4/Percona-XtraBackup-2.4.27/binary/tarball/percona-xtrabackup-2.4.27-Linux-x86_64.glibc2.12.tar.gz如果没有wget使用
curl -Ssl https://downloads.percona.com/downloads/Percona-XtraBackup-2.4/Percona-XtraBackup-2.4.27/binary/tarball/percona-xtrabackup-2.4.27-Linux-x86_64.glibc2.12.tar.gz >percona-xtrabackup-2.4.27-Linux-x86_64.glibc2.12.tar.gz解压缩
tar percona-xtrabackup-2.4.27-Linux-x86_64.glibc2.12.tar.gz  -C /opt

mv /opt/percona-xtrabackup-2.4.27-Linux-x86_64.glibc2.12 /opt/xtrabackup-2.4.27
第三方软件结构说明
第三方软件的结构,除了Windows下的软件
soft
|_ bin
|_ etc(conf)
|lib
|doc
|_log
设置PATH路径
PATH=PATH:/opt/xtrabackup-2.4.27
echo "export PATH=PATH:/opt/xtrabackup-2.4.27" >>~/.bash_profile

## 直接进行全量备份

xtrabackup --defaults-file=/etc/my.cnf --backup --user=root --password='1qaz!QAZ' --socket=0  --compress --compress-thread --parallel=4 --throttle=400 --target-dir=/data/backup/full
这种安装方法会缺少很多包。
libev.so.4()(64bit) is needed by percona-xtrabackup-24-2.4.28-1.el7.x86_64
    perl(DBD::mysql) is needed by percona-xtrabackup-24-2.4.28-1.el7.x86_64
    perl(Digest::MD5) is needed by percona-xtrabackup-24-2.4.28-1.el7.x86_64
    rsync is needed by percona-xtrabackup-24-2.4.28-1.el7.x86_64
发现要额外安装4个包
  yum -y install rsync
  yum -y install perl-Data-Dump
  yum -y install perl-DBD-MySQL
  yum -y install perl-Digest-MD5.x86_64
  yum -y install libev
开始全量备份
xtrabackup --defaults-file=/etc/my.cnf --backup --user=root --password='1qaz!QAZ' --socket=/var/mysqld/mysql.sock --compress --compress-thread --parallel=4 --throttle=400 --target-dir=/data/backup/full其中socket文件在 /etc/my.cnf有配置。

全量恢复
(1)全量备份
[root@master backups]# innobackupex –user=root –password=123456 –host=127.0.0.1 /backups/ #在master上进行全库备份#语法解释说明:
#–user=root 指定备份用户
#–password=123456 指定备份用户密码
#–host 指定主机
#/backups 指定备份目录
[root@master backups]# ll
total 0
drwxr-x— 7 root root 232 Jul 30 11:01 2018-07-30_11-01-37
[root@master backups]# ll 2018-07-30_11-01-37/ #查看备份数据
total 77856
-rw-r—– 1 root root 418 Jul 30 11:01 backup-my.cnf #备份用到的配置选项信息文件
-rw-r—– 1 root root 79691776 Jul 30 11:01 ibdata1 #数据文件
drwxr-x— 2 root root 20 Jul 30 11:01 kim
drwxr-x— 2 root root 4096 Jul 30 11:01 mysql
drwxr-x— 2 root root 4096 Jul 30 11:01 performance_schema
drwxr-x— 2 root root 20 Jul 30 11:01 repppp
drwxr-x— 2 root root 4096 Jul 30 11:01 wordpress
-rw-r—– 1 root root 21 Jul 30 11:01 xtrabackup_binlog_info #mysql服务器当前正在使用的二进制日志文件和此时二进制日志时间的位置信息文件
-rw-r—– 1 root root 113 Jul 30 11:01 xtrabackup_checkpoints #备份的类型、状态和LSN状态信息文件
-rw-r—– 1 root root 482 Jul 30 11:01 xtrabackup_info
-rw-r—– 1 root root 2560 Jul 30 11:01 xtrabackup_logfile #备份的日志文件
(2)恢复
[root@slave ~]# /etc/init.d/mysqld stop #停止slave上的mysql
Shutting down MySQL.. SUCCESS!
[root@slave tools]# yum install -y percona-xtrabackup-24-2.4.9-1.el7.x86_64.rpm #安装xtrabackup
[root@master backups]# scp -r 2018-07-30_11-01-37/ root@192.168.56.12:/backups/ #从master上拷贝备份数据
[root@slave tools]# innobackupex –apply-log /backups/2018-07-30_11-01-37/ #合并数据,使数据文件处于一致性的状态
180729 23:18:23 innobackupex: Starting the apply-log operation
IMPORTANT: Please check that the apply-log run completes successfully.
At the end of a successful apply-log run innobackupex
prints “completed OK!”.
innobackupex version 2.4.9 based on MySQL server 5.7.13 Linux (x86_64) (revision id: a467167cdd4)
xtrabackup: cd to /backups/2018-07-30_11-01-37/
xtrabackup: This target seems to be not prepared yet.
InnoDB: Number of pools: 1
xtrabackup: xtrabackup_logfile detected: size=8388608, start_lsn=(3127097)
……
InnoDB: FTS optimize thread exiting.
InnoDB: Starting shutdown…
InnoDB: Shutdown completed; log sequence number 3129915
180729 23:18:30 completed OK!
[root@slave ~]# rm -rf /usr/local/mysql/data/ #在slave上删除原有的数据
[root@slave ~]# vim /etc/my.cnf #配置my.cnf的数据目录路径,否则会报错,要和master一致
datadir=/usr/local/mysql/data
[root@slave ~]# innobackupex –copy-back /backups/2018-07-30_11-01-37/ #在slave上数据恢复
180729 23:32:03 innobackupex: Starting the copy-back operation
IMPORTANT: Please check that the copy-back run completes successfully.
At the end of a successful copy-back run innobackupex
prints “completed OK!”.
……
180729 23:32:08 completed OK! #看到completed OK就是恢复正常了
[root@slave ~]# ll /usr/local/mysql/data/ #slave上查看数据目录,可以看到数据已经恢复,但是属主会有问题,需要进行修改,所以一般使用mysql的运行用户进行恢复,否则需要进行修改属主和属组信息
total 188432
-rw-r—– 1 root root 79691776 Jul 29 23:32 ibdata1
-rw-r—– 1 root root 50331648 Jul 29 23:32 ib_logfile0
-rw-r—– 1 root root 50331648 Jul 29 23:32 ib_logfile1
-rw-r—– 1 root root 12582912 Jul 29 23:32 ibtmp1
drwxr-x— 2 root root 20 Jul 29 23:32 kim
drwxr-x— 2 root root 4096 Jul 29 23:32 mysql
drwxr-x— 2 root root 4096 Jul 29 23:32 performance_schema
drwxr-x— 2 root root 20 Jul 29 23:32 repppp
drwxr-x— 2 root root 4096 Jul 29 23:32 wordpress
-rw-r—– 1 root root 482 Jul 29 23:32 xtrabackup_info
[root@slave ~]# chown -R mysql.mysql /usr/local/mysql/data/ #修改属主属组
[root@slave ~]# /etc/init.d/mysqld start #启动mysql
Starting MySQL. SUCCESS!
[root@slave ~]# mysql -uroot -p -e “show databases;” #查看数据,是否恢复
Enter password:
+——————–+
| Database |
+——————–+
| information_schema |
| kim |
| mysql |
| performance_schema |
| repppp |
| wordpress |
+——————–+`
最后编辑:严锋 更新时间:2025-12-25 10:39
